
What are Networks & Affiliated Networks
Network is the broad term used for a group of people pursuing a common interest or goal together. A network could be a peer learning group, a coalition taking joint action together toward a goal, a group that meets regularly to coordinate resources and efforts, a collective impact initiative working toward long-term systems change in a community, or anything else where people come together around a common purpose, goal, or vision.

Since many networks operate in the world as a constellation of many subgroups that come together to make a larger group, Civic Network is structured the same way. A network can have numerous Affiliated Networks, or subnetworks of the larger network. A network that has affiliated networks, or subgroups, is called a Parent Network.
Affiliated networks often represent action teams, work groups, or committees that make up the structure of the larger group, or parent network. The benefit of creating an affiliated network is to provide a separate, but linked, work space and identity for the subgroups so they can stay organized apart from the workings of the larger group while still staying connected and informed. Affiliated networks have the full functionality of a network on Civic Network — the only difference is that they are affiliated with a parent network and there is an option for their information such as membership, documents, meetings, actions, etc. to “roll up” and be visible on the parent network. See below for more on creating networks and affiliated networks.
How to Create a Network
1. Once you are logged in, click on your name in the upper right corner and select “Create a Network” from the dropdown menu that appears.
2. Complete the required fields with a red asterisk, which include:
3. Complete the additional, non-required fields now or later. You can return at any time to edit any fields.
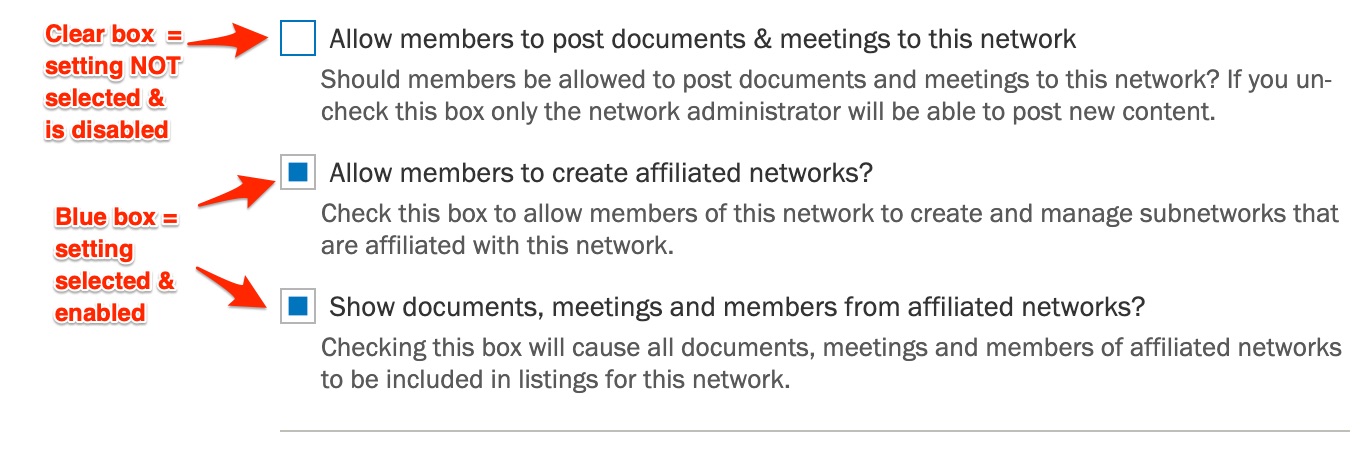
4. Decide on settings for your network. The default settings are set to the most open options for allowing members to contribute to the network. You can change these setting now or at any time. The setting has been selected and enabled if the box is blue.
5. Once you’ve completed the required fields and any others you desire, scroll to the bottom of the page and click the blue “Save” button.
How to Create Affiliated Networks
Follow the same steps as above to create a new network. In this process, the key step to create an affiliated network is to select from the box titled “Parent Network” the name of the network you want to make the parent network. This box will only contain the names of the networks you are a member of and have settings that allow members to create affiliated networks. (Networks have the option to allow or not allow their members to create affiliated networks. This setting can be changed at any time by a network coordinator or admin on the edit network page.)
How to Affiliate an Existing Network with a Parent Network
- When you are logged in, click on your name in the upper right corner of the webpage and select “Manage my Networks” from the dropdown menu that appears.
- Under the “Networks that I’m Managing” header, click on the network you want to make an affiliated network.
- On the network’s page, click the orange “Edit Network” button near the top of the screen (only visible if you are a network coordinator or admin).
- In the box that says “Parent Network”, click on the name of network that you would like to make the parent network (only the names of networks that you are a member of will appear in this box).